How to evaluate a pitted area in an Aboveground Storage Tank
By Carlos Molina
Pitting is almost a common denominator of all types of localized corrosion. In fact, pitting in tanks can be a consequence of CUI (Corosion under Insulation), MIC (Microbiologically induced corrosion), Soil corrosion, Sour water corrosion, etc, all damage mechanisms mentioned in the BOK for the API 653 exam.
Having this in mind, how can we evaluate shell pitting in tanks? Please keep reading, as the explanation in the API 653 is very short.
API 653 says the following about pitting in tank shells
4.2.3.2 Areas that are pitted shall be evaluated to determine the likelihood of through-pitting occurring prior to the next scheduled internal inspection. If so, the affected areas shall be repaired or replaced.
And this
4.3.2.2 Widely scattered pits may be ignored provided that:
a) no pit depth results in the remaining shell thickness being less than one-half the minimum acceptable tank shell thickness exclusive of the corrosion allowance; and
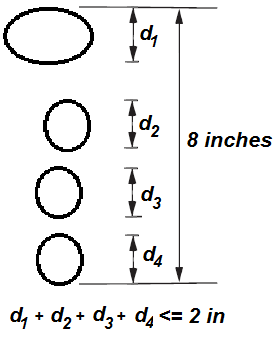
b) the sum of their dimensions along any vertical line does not exceed 2 in. in an 8-in. length (see Figure 4.2).
In order for the inspector to correctly evaluate a pitted area, he must understand that pitting is barely the same as any other thinning of the tank shell (although causes and corrosion rate can vary). No pit should be so big that the shell is thinner than the minimum thickness. However, the standard is somewhat generous and allows for a thickness greater than one-half of the minimum thickness.
Besides, pits are treated like any other area of the shell when speaking about corrosion rate. Inspectors should determine the likelihood of through-pitting in the shell prior to the next inspection and, if chances are high, he may choose to repair the affected areas.
SHELL PITTING EVALUATION
So there are 2 main things to do
1 ) Calculate maximum acceptable pit depth.
As a general rule, the larger the static pressure, the smaller the pits can be. For example, let´s calculate minimum depth for a pit in the first and third courses of the of a tank.
[adToAppearHere]
Example problem: Pitting was detected in the first and third courses of a tank. The product stored is naphta with a specific gravity of 0,76. D= 50ft. CA = 0,0625in. All the courses are originally 6mm thick except the bottom course that is 6,35mm thick. The material is A36M steel. Design level is 38ft, while the pitted spots are at 18ft and 33ft below maximum liquid level respectively. E= 1. What is the size of the bigger allowable pits?
Solution. For the calculations, we will use the following equation
![]()
With this equation and the given data, the soultions go like this. For the third course
![]()
Having in mind that pits cannot result in the remaining shell thickness being less than one-half the minimum acceptable tank shell thickness, then the biggest allowable pit for the third course is
![]()
For the bottom course
![]()
The minimum allowable thickness related to an scattered pit in that zone the bottom course
![]()
If you need to know if the tank is fit for continued service until the next inspection, add the corrosion allowance. Pits can be measured with a needle depth gage as see in this video I found in my research.
For zones of the shell close to a joint with a joint efficiency less than 1, it means that the amount of tolerable corrosion in the steel away from the weld is greater than the amount of tolerable corrosion in the joint.
2) Determine the maximum length of pits in any 8” vertical length
This is just as it says. Consider the following diagram based in API 653´s Figure 4.2.
Of course, all pits do not inmediatelly threaten tank integrity, but they can be the starting point for another issues. For example, fatigue and stress corrosion cracking may initiate at the base of corrosion pits. Pits are not always perfect round. Sometimes there are worm-like pits that cannot be easily measured. That is when you will need to use a technique like Penetrant testing, Ultrasonic testing or Magnetic testing to measure the pits. However, none of this methods has proven to be accurate an they only give an approximation of pit details. As a good inspection practice, you should stablish a protocol for visual inspection of pitted areas. You should measure your pits indensity, size an depth, and make charts with it as in ASME G46-94. Regarding repairs, it is acceptable by the standard to fill in with welding the pits if there is slight pitting due to corrosion on a tank shell, or even better, replace the pitting area, so you can avoid or reduce the inspection and testing required.
[adToAppearHere]
When there is too much pitting, it is regarded as general corrosion and should be evaluated according to API 653 4.3.2.1. The depth of any pit in a generally corroded area adds to the generally corroded area depth.
PITTING IN THE TANK BOTTOM
In general pitting of the tank´s bottom should be compared against the minimum value of 0,1inches allowable, exclusive of any corrosion allowance until the next inspection.
SUMMARY
Pitting evaluation according to API 653 is extremely simple. You just 1)calculate the depth of the pits and compare to 50% of Tmin, and 2) make sure the sum of pit dimensions in an 8″ vertical line is lower than 2″. However, it is of utmost importance that you can differentiate between widely scattered pits and general corrosion.
Thanks a lot for reading and tell me…..What am I missing here? Let me know in the comments and I’ll add it in!
Latest comments
nice.so helpfull
- kundan